개요
라즈베리파이 4(Raspberry 4) Ubuntu 22.04에 FreePBX (Asterisk)를 설치한 과정으로, 알려진 설치 방법과 크게 다르지 않지만 중간에 발생되는 오류 해결 과정을 남긴다.
출처
이 문서에 대한 저작권을 굳이 주장할 의도는 없으나 글의 작성자와 출처 표기를 위하여 앞으로는 최초 공개된 문서의 주소를 함께 남겨 두려고 한다. 작성자는 과거의 기억과 새로 연습하면서 글을 쓰는 단계이기때문에 작성 글에 오류가 존재할 수 있으며 특별한 언급 없이 계속 글을 수정하고 있기 때문에 다른 경로에서 본 글을 읽었다면 최신의 글을 한번 확인해 주기 바란다.
이 문서의 최신 버전은 https://hacked.mx/539 에 게시되어 있다.
설치 과정
RasPBX를 이용하면 라즈베리파이에 FreePBX 시스템을 쉽게 구축할 수 있지만 기존에 설치된 Ubuntu 22.04 운영체제를 그대로 활용하기 위하여 직접 패키지를 설치하였다. 설치 과정은 How to Install FreePBX on Ubuntu 20.04 (Open Source PBX Tutorial)라는 문서를 참고하였다.
기본 패키지 설치
FreePBX 설치에 필요한 패키지를 미리 설치해둔다. Ubuntu의 apt-get 명령어를 사용하며 root 권한으로 실행한다. 일반적으로 root 권한이 필요한 경우에 한하여 sudo 명령을 실행하는 것을 권장하지만 편의상 root 권한으로 작업하도록 한다. 문서의 명령 구문에서 #로 시작하는 부분은 주석이 아닌 root 권한을 의미한다. 아래의 패키지 설치 이후에도 과정 중간에 필요한 패키지를 계속 설치하고 있다.
# apt-get update -y
# apt-get upgrade -y
# apt-get install unzip git gnupg2 curl libnewt-desapt-get install unzip git gnupg2 curl libnewt-dev li
bssl-dev libncurses5-dev subversion libsqlite3-dev bld-essential libjansson-dev libxml2-dev uuid-dev subversion -y
Asterisk 설치
Asterisk를 다운로드 받는다. 여기에서는 참고한 문서와 동일하게 Asterisk 18-current를 받았지만 최신 LTS 버전인 Asterisk 20-current를 받는것이 더 좋아보인다.
# wget http://downloads.asterisk.org/pub/telephony/asterisk/asterisk-18-current.tar.gz다운로드한 asterisk 압축 파일을 해제하고 설치를 위한 사전 작업을 수행한다.
# tar -xvzf asterisk-18-current.tar.gz
# cd asterisk-18.*
# contrib/scripts/get_mp3_source.sh
A    addons/mp3
A    addons/mp3/MPGLIB_README
A    addons/mp3/common.c
A    addons/mp3/huffman.h
A    addons/mp3/tabinit.c
A    addons/mp3/Makefile
A    addons/mp3/README
A    addons/mp3/decode_i386.c
A    addons/mp3/dct64_i386.c
A    addons/mp3/MPGLIB_TODO
A    addons/mp3/mpg123.h
A    addons/mp3/layer3.c
A    addons/mp3/mpglib.h
A    addons/mp3/decode_ntom.c
A    addons/mp3/interface.c
Exported revision 204.
# contrib/scripts/install_prereq install
The following packages were automatically installed and are no longer required:
  dctrl-tools dmeventd dmraid dpkg-repack efibootmgr gir1.2-timezonemap-1.0 gir1.2-xkl-1.0 grub-common grub-efi-arm64
  grub-efi-arm64-bin grub-efi-arm64-signed grub2-common kpartx kpartx-boot libdebian-installer4
  libdevmapper-event1.02.1 libdmraid1.0.0.rc16 libflashrom1 libftdi1-2 libllvm13 liblvm2cmd2.03 libtimezonemap-data
  libtimezonemap1 lvm2 os-prober python3-icu python3-pam rdate thin-provisioning-tools
Use 'sudo apt autoremove' to remove them.
config 작업을 수행한다.
./configure
checking build system type... aarch64-unknown-linux-gnu
checking host system type... aarch64-unknown-linux-gnu
checking for gcc... gcc
checking whether the C compiler works... yes
checking for C compiler default output file name... a.out
checking for suffix of executables...
checking whether we are cross compiling... no
checking for suffix of object files... o
checking whether we are using the GNU C compiler... yes
checking whether gcc accepts -g... yes
checking for gcc option to accept ISO C89... none needed
checking how to run the C preprocessor... gcc -E
checking for grep that handles long lines and -e... /usr/bin/grep
checking for egrep... /usr/bin/grep -E
...
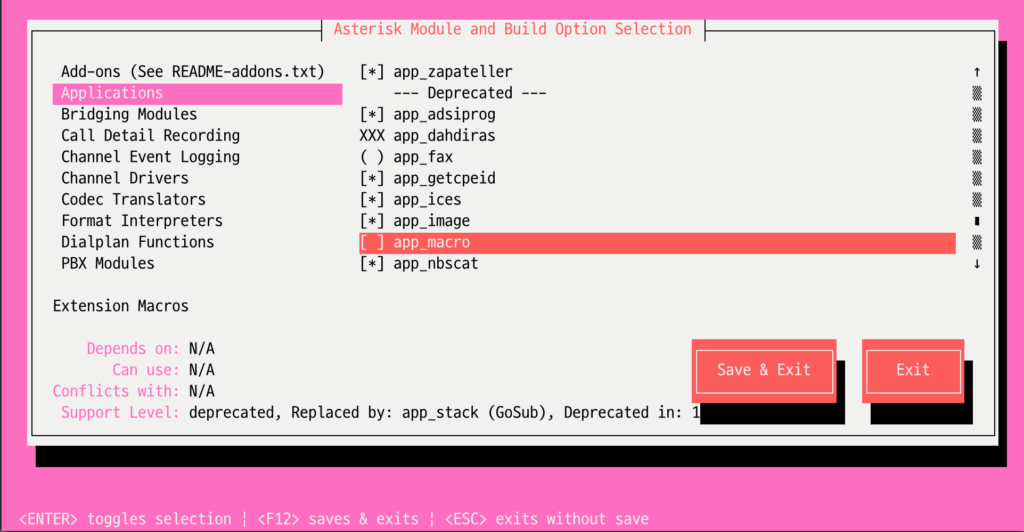
make menuselect를 실행하여 설치할 모듈들을 선택한다. 본인의 환경에 맞게 설정하면 되지만 필요한 모듈이 없는 경우에는 기능이 정상적으로 동작 되지 않을 수 있다. 필자는 아래와 같이 설정 하였다. 이후에 문제가 발생하는 경우에는 다시 실행하여 모듈을 설치하면 된다.
참고 링크의 문서와 동일하게 선택 하였는데 내 경우에는 나중에 오류가 발생되어서 여기에서 deprecated 기능 중 하나인 app_macro를 선택하였다.

설치할 모듈 선택을 완료한 후 make 명령으로 빌드한다.
# make -j2
   [CC] astcanary.c -> astcanary.o
   [CC] astdb2sqlite3.c -> astdb2sqlite3.o
   [CC] hash/hash.c -> hash/hash.o
   [CC] hash/hash_bigkey.c -> hash/hash_bigkey.o
   [CC] hash/hash_buf.c -> hash/hash_buf.o
   [CC] astdb2bdb.c -> astdb2bdb.o
   [CC] hash/hash_func.c -> hash/hash_func.o
   [CC] hash/hash_log2.c -> hash/hash_log2.o
   [LD] astcanary.o -> astcanary
...
Building Documentation For: channels pbx apps codecs formats cdr cel bridges funcs tests main res addons
 +--------- Asterisk Build Complete ---------+
 + Asterisk has successfully been built, and +
 + can be installed by running:              +
 +                                           +
 +                make install               +
 +-------------------------------------------+
make install 명령으로 설치를 완료한다.
# make install
Installing modules from channels...
Installing modules from pbx...
Installing modules from apps...
Installing modules from codecs...
Installing modules from formats...
Installing modules from cdr...
Installing modules from cel...
...
기타 나머지 설정 및 권한 조정 등을 수행한다.
# make samples
Installing adsi config files...
/usr/bin/install -c -d "/etc/asterisk"
Installing configs/samples/asterisk.adsi
Installing configs/samples/telcordia-1.adsi
Installing other config files...
Installing file configs/samples/acl.conf.sample
...
Installing file phoneprov/polycom.xml
Installing file phoneprov/polycom_line.xml
Installing file phoneprov/snom-mac.xml
# make config
# ldconfig
# groupadd asterisk
# useradd -r -d /var/lib/asterisk -g asterisk asterisk
# usermod -aG audio,dialout asterisk
# chown -R asterisk.asterisk /etc/asterisk
# chown -R asterisk.asterisk /var/{lib,log,spool}/asterisk
# chown -R asterisk.asterisk /usr/lib/asterisk
/etc/default/asterisk 에서 아래와 같이 수정한다.
AST_USER="asterisk"
AST_GROUP="asterisk"
/etc/asterisk/asterisk.conf 에서 아래와 같이 수정한다.
runuser = asterisk ; The user to run as.
rungroup = asterisk ; The group to run as.
systemctl restart asterisk를 실행하여 서비스를 재실행하고 systemctl status asterisk의 서비스 상태를 확인한다. 아래와 같이 오류가 확인되는 경우 다음 명령을 수행하고 서비스를 재시작한다.
# systemctl restart asterisk
# systemctl status asterisk
● asterisk.service - LSB: Asterisk PBX
     Loaded: loaded (/etc/init.d/asterisk; generated)
     Active: active (running) since Sun 2023-07-09 13:32:29 KST; 4s ago
       Docs: man:systemd-sysv-generator(8)
    Process: 40084 ExecStart=/etc/init.d/asterisk start (code=exited, status=0/SUCCESS)
      Tasks: 82 (limit: 8944)
     Memory: 47.4M
        CPU: 2.616s
     CGroup: /system.slice/asterisk.service
             └─40099 /usr/sbin/asterisk -U asterisk -G asterisk

 7월 09 13:32:29 pi systemd[1]: Starting LSB: Asterisk PBX...
 7월 09 13:32:29 pi asterisk[40084]:  * Starting Asterisk PBX: asterisk
 7월 09 13:32:29 pi asterisk[40084]:    ...done.
 7월 09 13:32:29 pi systemd[1]: Started LSB: Asterisk PBX.
 7월 09 13:32:30 pi asterisk[40099]: radcli: rc_read_config: rc_read_config: can't open /etc/radiusclient-ng/radiusclie>
 7월 09 13:32:30 pi asterisk[40099]: radcli: rc_read_config: rc_read_config: can't open /etc/radiusclient-ng/radiusclie>
# sed -i 's";\[radius\]"\[radius\]"g' /etc/asterisk/cdr.conf
# sed -i 's";radiuscfg => /usr/local/etc/radiusclient-ng/radiusclient.conf"radiuscfg => /etc/radcli/radiusclient.conf"g' /etc/asterisk/cdr.conf
# sed -i 's";radiuscfg => /usr/local/etc/radiusclient-ng/radiusclient.conf"radiuscfg => /etc/radcli/radiusclient.conf"g' /etc/asterisk/cel.conf
# systemctl restart asterisk
# systemctl status asterisk
● asterisk.service - LSB: Asterisk PBX
Loaded: loaded (/etc/init.d/asterisk; generated)
Active: active (running) since Sun 2023-07-09 13:33:40 KST; 4s ago
Docs: man:systemd-sysv-generator(8)
Process: 40218 ExecStart=/etc/init.d/asterisk start (code=exited, status=0/SUCCESS)
Tasks: 82 (limit: 8944)
Memory: 47.8M
CPU: 2.623s
CGroup: /system.slice/asterisk.service
└─40233 /usr/sbin/asterisk -U asterisk -G asterisk
7월 09 13:33:40 pi systemd[1]: Starting LSB: Asterisk PBX...
7월 09 13:33:40 pi asterisk[40218]: * Starting Asterisk PBX: asterisk
7월 09 13:33:40 pi asterisk[40218]: ...done.
7월 09 13:33:40 pi systemd[1]: Started LSB: Asterisk PBX.
# asterisk -rvv
Asterisk 18.18.1, Copyright (C) 1999 - 2022, Sangoma Technologies Corporation and others.
Created by Mark Spencer <markster@digium.com>
Asterisk comes with ABSOLUTELY NO WARRANTY; type 'core show warranty' for details.
This is free software, with components licensed under the GNU General Public
License version 2 and other licenses; you are welcome to redistribute it under
certain conditions. Type 'core show license' for details.
=========================================================================
Running as user 'asterisk'
Running under group 'asterisk'
Connected to Asterisk 18.18.1 currently running on pi (pid = 40233)
pi*CLI> quit
Asterisk cleanly ending (0).
Executing last minute cleanupsFreePBX 설치
의존 패키지 설치
FreePBX를 설치하기 이전에 필요한 패키지를 미리 설치한다. PHP는 오랫동안 사용된 언어인 만큼 버전에 따라 많은 변화가 있어 웹 어플리케이션 구동을 위해서는 호환 버전을 설치해야 한다. 최근에는 많은 배포판들이 구버전을 유지하기 보다는 최신 버전 위주로 지원하다 보니 과거 버전의 설치가 대단히 번거롭다. FreePBX는 아직 PHP 8.X를 지원하지 않기 때문에 PHP 7.X를 사용해야 한다.
# apt-get install software-properties-common -y
# add-apt-repository ppa:ondrej/php -y
PPA publishes dbgsym, you may need to include 'main/debug' component
Repository: 'deb https://ppa.launchpadcontent.net/ondrej/php/ubuntu/ jammy main'
Description:
Co-installable PHP versions: PHP 5.6, PHP 7.x, PHP 8.x and most requested extensions are included. Only Supported Versions of PHP (http://php.net/supported-versions.php) for Supported Ubuntu Releases (https://wiki.ubuntu.com/Releases) are provided. Don't ask for end-of-life PHP versions or Ubuntu release, they won't be provided.

Debian oldstable and stable packages are provided as well: https://deb.sury.org/#debian-dpa

You can get more information about the packages at https://deb.sury.org
FreePBX 다운로드 및 압축 해제
# wget http://mirror.freepbx.org/modules/packages/freepbx/freepbx-15.0-latest.tgz
--2023-07-09 13:39:12--  http://mirror.freepbx.org/modules/packages/freepbx/freepbx-15.0-latest.tgz
Resolving mirror.freepbx.org (mirror.freepbx.org)... 172.67.42.223, 104.22.49.127, 104.22.48.127
Connecting to mirror.freepbx.org (mirror.freepbx.org)|172.67.42.223|:80... connected.
HTTP request sent, awaiting response... 200 OK
Length: 19701662 (19M) [application/octet-stream]
Saving to: ‘freepbx-15.0-latest.tgz’

freepbx-15.0-latest.tgz       100%[=================================================>]  18.79M  6.01MB/s    in 3.1s

2023-07-09 13:39:17 (6.01 MB/s) - ‘freepbx-15.0-latest.tgz’ saved [19701662/19701662]

# tar xvzf freepbx-15.0-latest.tgz
freepbx/
freepbx/installlib/
freepbx/installlib/installapplication.class.php
freepbx/installlib/installer.class.php
freepbx/installlib/files/
...
nodejs 설치
# apt-get install nodejs npm -y
Reading package lists... Done
Building dependency tree... Done
Reading state information... Done
The following additional packages will be installed:
  gyp javascript-common libjs-events libjs-highlight.js libjs-inherits libjs-is-typedarray libjs-psl libjs-source-map
  libjs-sprintf-js libjs-typedarray-to-buffer libnode-dev libnode72 libuv1-dev node-abab node-abbrev node-agent-base
...
FreePBX 설치 중 오류
Install 과정에서 오류가 발생된다. 확인 결과 PHP 7.2 대신 PHP 8.2가 기본 실행되고 있었다. PHP 8.2 버전으로 필요한 모듈들을 설치하였지만 계속 오류가 발생되어 PHP 7.X를 사용한다.
# ./install -n
PHP Fatal error:  Uncaught Error: Call to undefined function FreePBX\Install\simplexml_load_file() in /home/user/voip/freepbx/install:19
Stack trace:
#0 {main}
  thrown in /home/user/voip/freepbx/install on line 19
# apt-get install php7.2-xml
Reading package lists... Done
Building dependency tree... Done
Reading state information... Done
php7.2-xml is already the newest version (7.2.34-39+ubuntu22.04.1+deb.sury.org+1).
0 upgraded, 0 newly installed, 0 to remove and 19 not upgraded.
# systemctl reload apache2
# php -v
PHP 8.2.8 (cli) (built: Jul  8 2023 07:10:21) (NTS)
Copyright (c) The PHP Group
Zend Engine v4.2.8, Copyright (c) Zend Technologies
    with Zend OPcache v8.2.8, Copyright (c), by Zend Technologies

# /usr/bin/env php -v
PHP 8.2.8 (cli) (built: Jul  8 2023 07:10:21) (NTS)
Copyright (c) The PHP Group
Zend Engine v4.2.8, Copyright (c) Zend Technologies
    with Zend OPcache v8.2.8, Copyright (c), by Zend Technologies
# apt-get install libapache2-mod-php8.2 php8.2-cgi php8.2-common php8.2-curl php8.2-mbstring php8.2-gd php8.2-mysql php8.2-bcmath php8.2-zip php8.2-xml php8.2-imap php8.2-snmp -y
# systemctl reload apache2
# ./install -n
Assuming you are Database Root
Checking if SELinux is enabled...Its not (good)!
Reading /etc/asterisk/asterisk.conf...Done
Checking if Asterisk is running and we can talk to it as the 'asterisk' user...Yes. Determined Asterisk version to be: 18.18.1
Checking if NodeJS is installed and we can get a version from it...Yes. Determined NodeJS version to be: 12.22.9
Preliminary checks done. Starting FreePBX Installation
Checking if this is a new install...Yes (No /etc/freepbx.conf file detected)
Database Root installation checking credentials and permissions..Connected!
Blank /etc/odbc.ini file detected. Installing...Done
PHP Fatal error:  Declaration of FreePBX\Database::query() must be compatible with PDO::query(string $query, ?int $fetchMode = null, mixed ...$fetchModeArgs): PDOStatement|false in /home/user/voip/freepbx/amp_conf/htdocs/admin/libraries/BMO/Database.class.php on line 239
PHP 7.2 사용 지정
기본 지정된 PHP 8.2를 해제하고 PHP 7.2를 사용하도록 설정한 후 설치를 진행한다.
# a2dismod php8.2
Module php8.2 already disabled
# a2enmod php7.2
Considering dependency mpm_prefork for php7.2:
Considering conflict mpm_event for mpm_prefork:
Considering conflict mpm_worker for mpm_prefork:
Module mpm_prefork already enabled
Considering conflict php5 for php7.2:
Module php7.2 already enabled
# service apache2 restart
# update-alternatives --set php /usr/bin/php7.2
update-alternatives: using /usr/bin/php7.2 to provide /usr/bin/php (php) in manual mode
# update-alternatives --set phar /usr/bin/phar7.2
update-alternatives: using /usr/bin/phar7.2 to provide /usr/bin/phar (phar) in manual mode
# update-alternatives --set phar.phar /usr/bin/phar.phar7.2
update-alternatives: using /usr/bin/phar.phar7.2 to provide /usr/bin/phar.phar (phar.phar) in manual mode
# ./install -n
Assuming you are Database Root
Checking if SELinux is enabled...Its not (good)!
Reading /etc/asterisk/asterisk.conf...Done
Checking if Asterisk is running and we can talk to it as the 'asterisk' user...Yes. Determined Asterisk version to be: 18.18.1
Checking if NodeJS is installed and we can get a version from it...Yes. Determined NodeJS version to be: 12.22.9
Preliminary checks done. Starting FreePBX Installation
Checking if this is a new install...Yes (No /etc/freepbx.conf file detected)
Database Root installation checking credentials and permissions..Connected!
Empty asterisk Database going to populate it
..
Apache 설정 변경 적용
# sed -i 's/^\(User\|Group\).*/\1 asterisk/' /etc/apache2/apache2.conf
# sed -i 's/AllowOverride None/AllowOverride All/' /etc/apache2/apache2.conf
# sed -i 's/\(^upload_max_filesize = \).*/\120M/' /etc/php/7.2/apache2/php.ini
# sed -i 's/\(^upload_max_filesize = \).*/\120M/' /etc/php/7.2/cli/php.ini
# a2enmod rewrite
# systemctl restart apache2
FreePBX 웹 관리자 접속
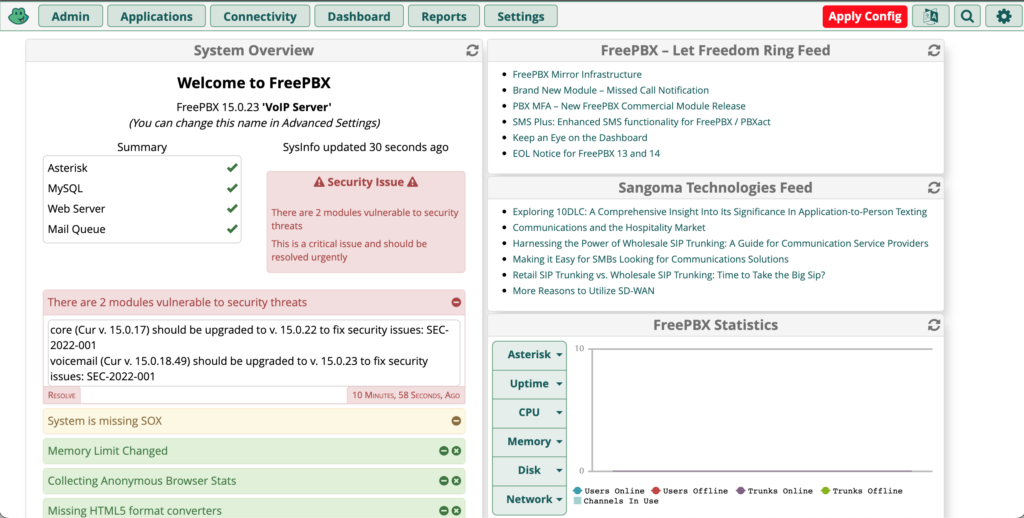
설치가 완료되면 웹을 통해 FreePBX에 접근할 수 있다. 기본 관리자 계정 설정 후 로그인한 화면은 아래와 같다. 보안 경고와 함께 최신 버전으로 모듈 업데이트를 권고하고 있다.

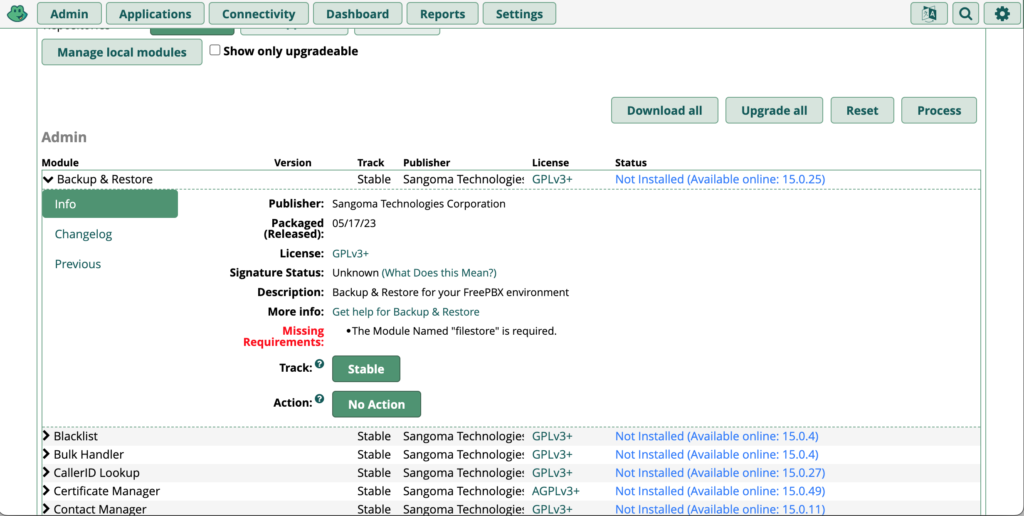
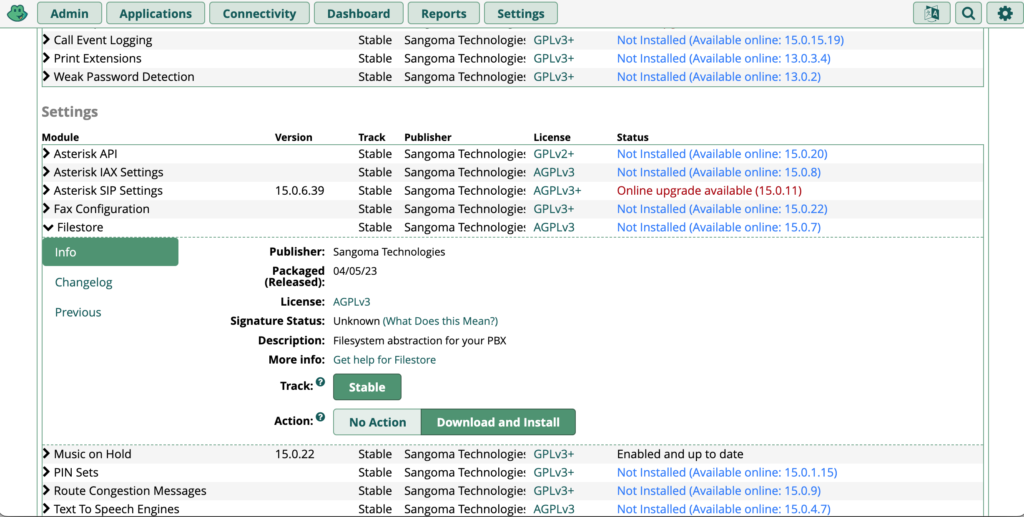
업데이트를 수행하려니 backup 모듈이 없다며 업데이트가 수행되지 않는다. 아래와 같이 backup 모듈을 설치하려면 Filestore 모듈을 먼저 설치해야 한다. 필요한 모듈들을 설치하고 업데이트를 수행한다.


이전 Asterisk의 Module 선택 과정에서 Macro를 선택하지 않았다면 아래와 같은 오류가 발생된다. 문제가 없는 경우 일반적인 FreePBX 설정 방법을 참고하여 환경을 구축할 수 있다.
pbx.c: No application 'Macro' for extension (from-internal, h, 1)결론
가급적 과정을 자세히 남기려 하다보니 내용이 길어졌지만 크게 어려운 부분이 존재하지 않는다. 다만 설치 과정에서는 여러 변수가 존재하여 매뉴얼대로 잘 되지 않는 경우가 있다. 대부분 의존성 문제거나 실수인 경우지만 가급적 검증된 환경에서 최신 버전 위주로 구성하는 것이 바람직하다.
라즈베리 파이에 FreePBX를 설치할 당시에는 홈 서버 기반의 PBX 시스템을 구축할 계획이었지만 외부 접근 허용의 문제로 내부에 서버를 운영하기 보다는 외부 클라우드 사용을 고려하고 있다. 실제 서비스를 위해서는 각자의 환경 및 비용을 고려하여 구축해야 할것이지만 단순히 재미를 위한 구축에는 라즈베리 파이로도 충분할것으로 생각된다.